Posts

GIS 4035 Lab5 Unsupervised & Supervised Classification

Image
  Boy oh Boy! Well, this Lab ended up taking a very negative turn for me. Before I explain how I failed in this module I will explain the lab. For module 5 we learned how to use supervised and unsupervised classification. This allows the user to better classify features in an image to create a more detail. One way this is helpful is it allows you to merge objects that have similar content into one single feature. The image you see above is not even close to what was required for this Lab. This is actually the perfect example of what a bad layout for this project looks like. What happened is I created an image prior to this one that was a lot more detailed and significantly closer to what was asked for. The problem I ran into was that the water features were not coming in the way I wanted them to. So, in order to make the map more aesthetically pleasing I decided to go back and try and make some edits. I messed up when I overwrote the previous image, I ended up with an image along w...

GIS 4035 Lab 4 Spatial Enhancement, Multispectral Data, and Band Indices

Image
  Lab 4 was undoubtedly the most challenging lab thus far for me. Not because it was hard but mainly due to the large amount of information in this lab. Despite the challenges I did find this lab to be interesting. There were quite a few deliverables in this lab, and it also required students to jump back and forth between Arc Pro and ERDAS quite a bit. All the work on this lab resulted in the layout you see above. Essentially what you see is a layout showing 3 separate images all using a different set of bands and focusing on different objects. Students were instructed to use the histogram and analyze spikes to determine certain features on the map.       

GIS 4035 Lab 3 Intro to ERDAS Image & Digital Data

Image
   In lab 3 we did an introduction to an application called ERDAS. In the introduction we did an overview of the application and its capabilities. While reviewing the application we created a small map and added the area of each individual attribute in hectares. Overall, this was a good lab. I did run into a few issues along the way but after going back and checking my work and even redoing sections I was able to get exactly what I needed done. 

GIS 4035 Lab 2 LULC, Ground Truthing & Accuracy Assessment

Image
 For this lab we took a look at an arial image of Pascagoula Mississippi. From the arial we drew polygons on all areas and labeled them the classification we thought they would be. Once we classified all areas of the arial we used a method called Ground Truthing to test the validity of our classifications. Ground Truthing in this assignment consisted of us using google maps to look at a street view image to determine if our classification was correct. I found this assignment to be enjoyable and I look forward to the next.   

Visual Interpretation Module 1

Image
  For the first Lab in Photo Interpretation & Remote Sensing we created two deliverables. For the first we took an aerial photo and covered Tones and Textures. We looked at the different tones one could find on an aerial image. Once we identified 5 different tomes on the image ranging from Very Dark to Very Light, we then looked at textures. The aerial shows different areas that have various textures ranging from Very Smooth to Very Course.    For the second deliverable we identified various features on the aerial based on a few different criteria. Firstly, we identified features based on the shape and size of the feature. Secondly, we identified features based on their pattern. Thirdly, we identified features based on their shadows. This was an interesting one to me, mainly because I had not considered that a shadow could help one to identify a feature if the feature is somewhat obscure from the aerial. Lastly, we identified features by association. This means that w...

Final Project Bobwhite-Manatee Transmission Line

Image
Wow! I do not even know where to begin. This has by far been the most stressful and intensive school project I have ever had to complete. I have worked on this project from 7:00 pm to after 1:00am every weekday this week. Aside from sleep deprivation making this project challenging I also struggled greatly due to the lack of instruction. While I understand that aspect of the assignment these kinds of projects become very challenging for me because I over think the process and end up having a symptom some call "paralysis by analysis." Despite those struggles I pressed through and came out with a halfway decent result. I do wish I had more time on this project to clarify some things and make my data more readable, also due to time constraints there were several things I was no able to compete but for the time being I think my results will be acceptable.  I will give a brief overview of the final project. I only attached two of the maps I created because if I were to add them al...

Module 6 Lab Georeferencing, Editing, & 3D

Image
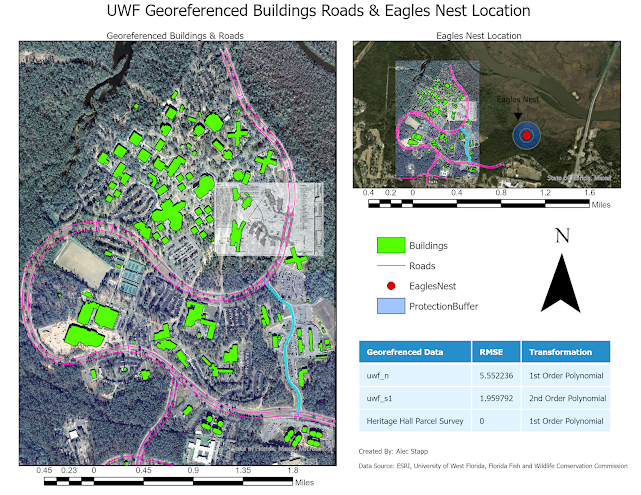
  In the first part of Lab 6 we learned about Georeferencing. In Georeferencing you take arial images and match them up to a base map in Arc GIS Pro. You use a function called Georeference which allows you to select points on the basemap as well as the image in order to align them on top of one another. I can see this particular tool being very useful.   In the second part of Lab 6 we learned how to take the first map we made with the Georeference tool and turn it into a 3D image. This was not a required task, but I was very interested to see exactly how it works. Overall, it was very interesting to take what was a 2D object and turn it into a 3D object. I look forward to messing around with this function more in the future.